> ## Documentation Index
> Fetch the complete documentation index at: https://docs.phylax.systems/llms.txt
> Use this file to discover all available pages before exploring further.
# Projects
> Create and manage projects in the Phylax platform
Projects are the organizational unit in the [Phylax platform](https://app.phylax.systems). Each project represents a protocol or set of smart contracts that you want to protect with assertions.
## What are Projects?
Projects enable you to manage all your protocol's assertions from a single interface. The project itself is an off-chain organizing layer; the on-chain [State Oracle](/credible/credible-layer-contracts#state-oracle) remains the source of truth for which assertions are active for each protected contract.
A project groups together:
* One or more smart contract addresses
* Assertions that protect those contracts
* Pending and deployed releases
* Staging and production invalidations
* Notification settings and project events
* Collaborators and role-based access
## Creating a Project
To create a new project:
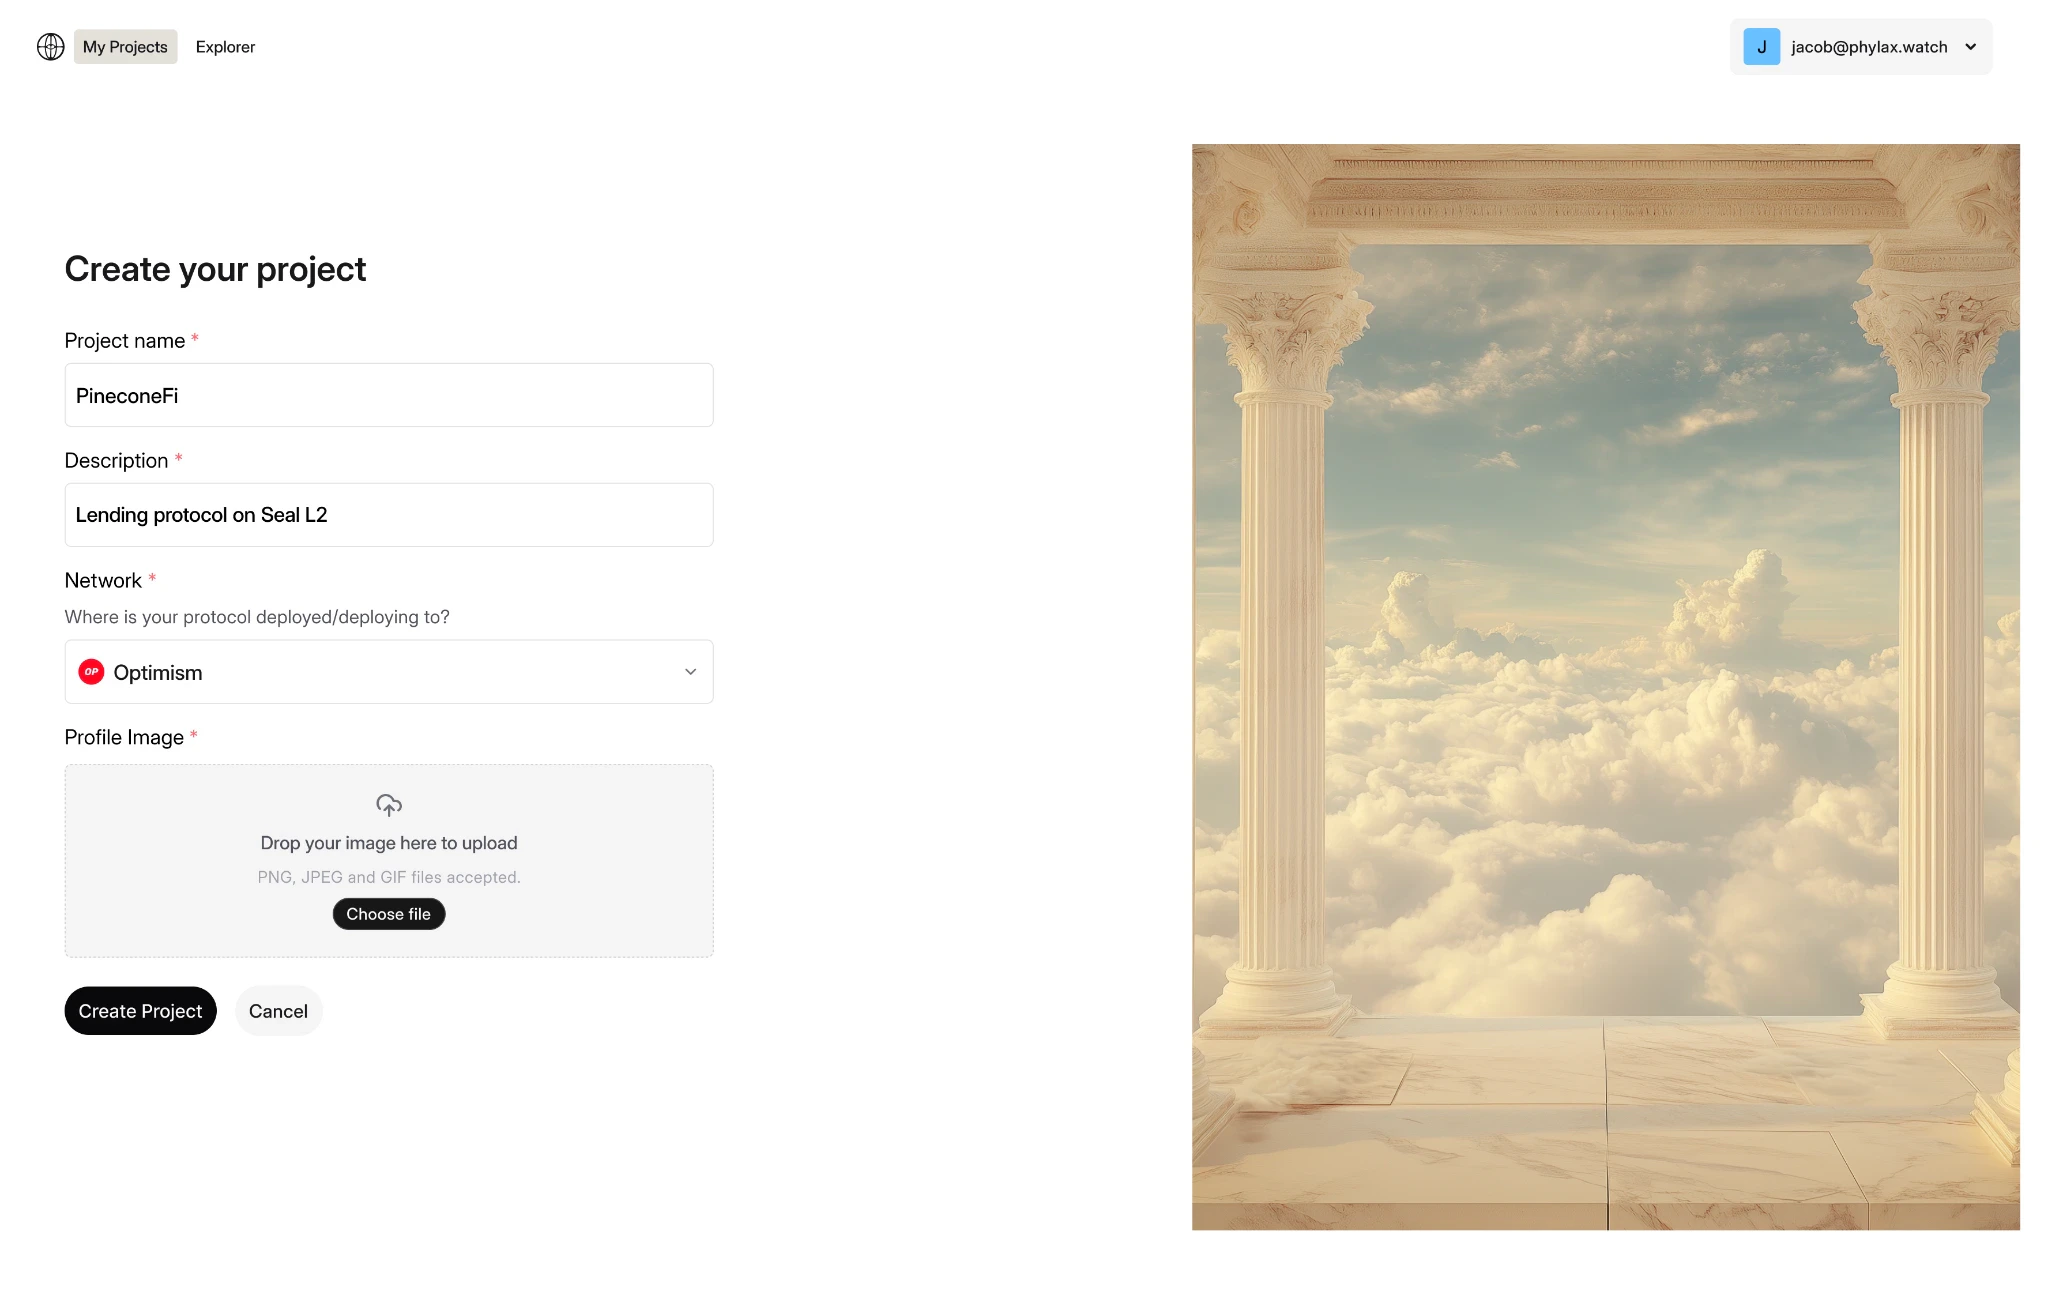
1. Navigate to the "Projects" tab in the platform navigation bar
2. Click "Create a project"
3. Enter project details:
* **Project Name**: Typically matches your protocol or contract name
* **Project Description**: Brief explanation of what your project does
* **Target Chain**: The blockchain where your contracts are deployed
4. Click "Continue"
5. Add contract addresses:
* Enter each contract address you want to protect
* Only contracts where your wallet is authorized can be added
* The platform verifies admin access via the network's admin verifier (often owner-based)
6. Review your project details
7. Click "Create Project" to create the project
 Only authorized admins can create a project for a contract. Most deployments use owner-based verification by default. See [Ownership Verification](/credible/ownership-verification) for details.
For rollup contracts that don't pass the default verifier, you may be able to [request manual verification](/credible/manual-verification). Manual verification is not available for Ethereum mainnet contracts.
## Managing Projects
Once created, you can manage your project through the project dashboard:
### View Project Details
* See all contract addresses in the project
* View project metadata
* See all assertions
* See project events in the audit log, including assertion, contract, release, notification, collaborator, and invalidation activity
* See all [invalidations](/credible/dapp-invalidations)
### Create a Release
* Run `pcl apply` to build your assertions and create a pending release
* Review the requested assertion changes before confirming the release
* Open the returned release link in the platform
### Deploy the Release Onchain
* Review the release and link assertions to protected contracts
* Confirm whether the release targets Staging or Production
* Sign the deployment transaction
Only authorized admins can create a project for a contract. Most deployments use owner-based verification by default. See [Ownership Verification](/credible/ownership-verification) for details.
For rollup contracts that don't pass the default verifier, you may be able to [request manual verification](/credible/manual-verification). Manual verification is not available for Ethereum mainnet contracts.
## Managing Projects
Once created, you can manage your project through the project dashboard:
### View Project Details
* See all contract addresses in the project
* View project metadata
* See all assertions
* See project events in the audit log, including assertion, contract, release, notification, collaborator, and invalidation activity
* See all [invalidations](/credible/dapp-invalidations)
### Create a Release
* Run `pcl apply` to build your assertions and create a pending release
* Review the requested assertion changes before confirming the release
* Open the returned release link in the platform
### Deploy the Release Onchain
* Review the release and link assertions to protected contracts
* Confirm whether the release targets Staging or Production
* Sign the deployment transaction
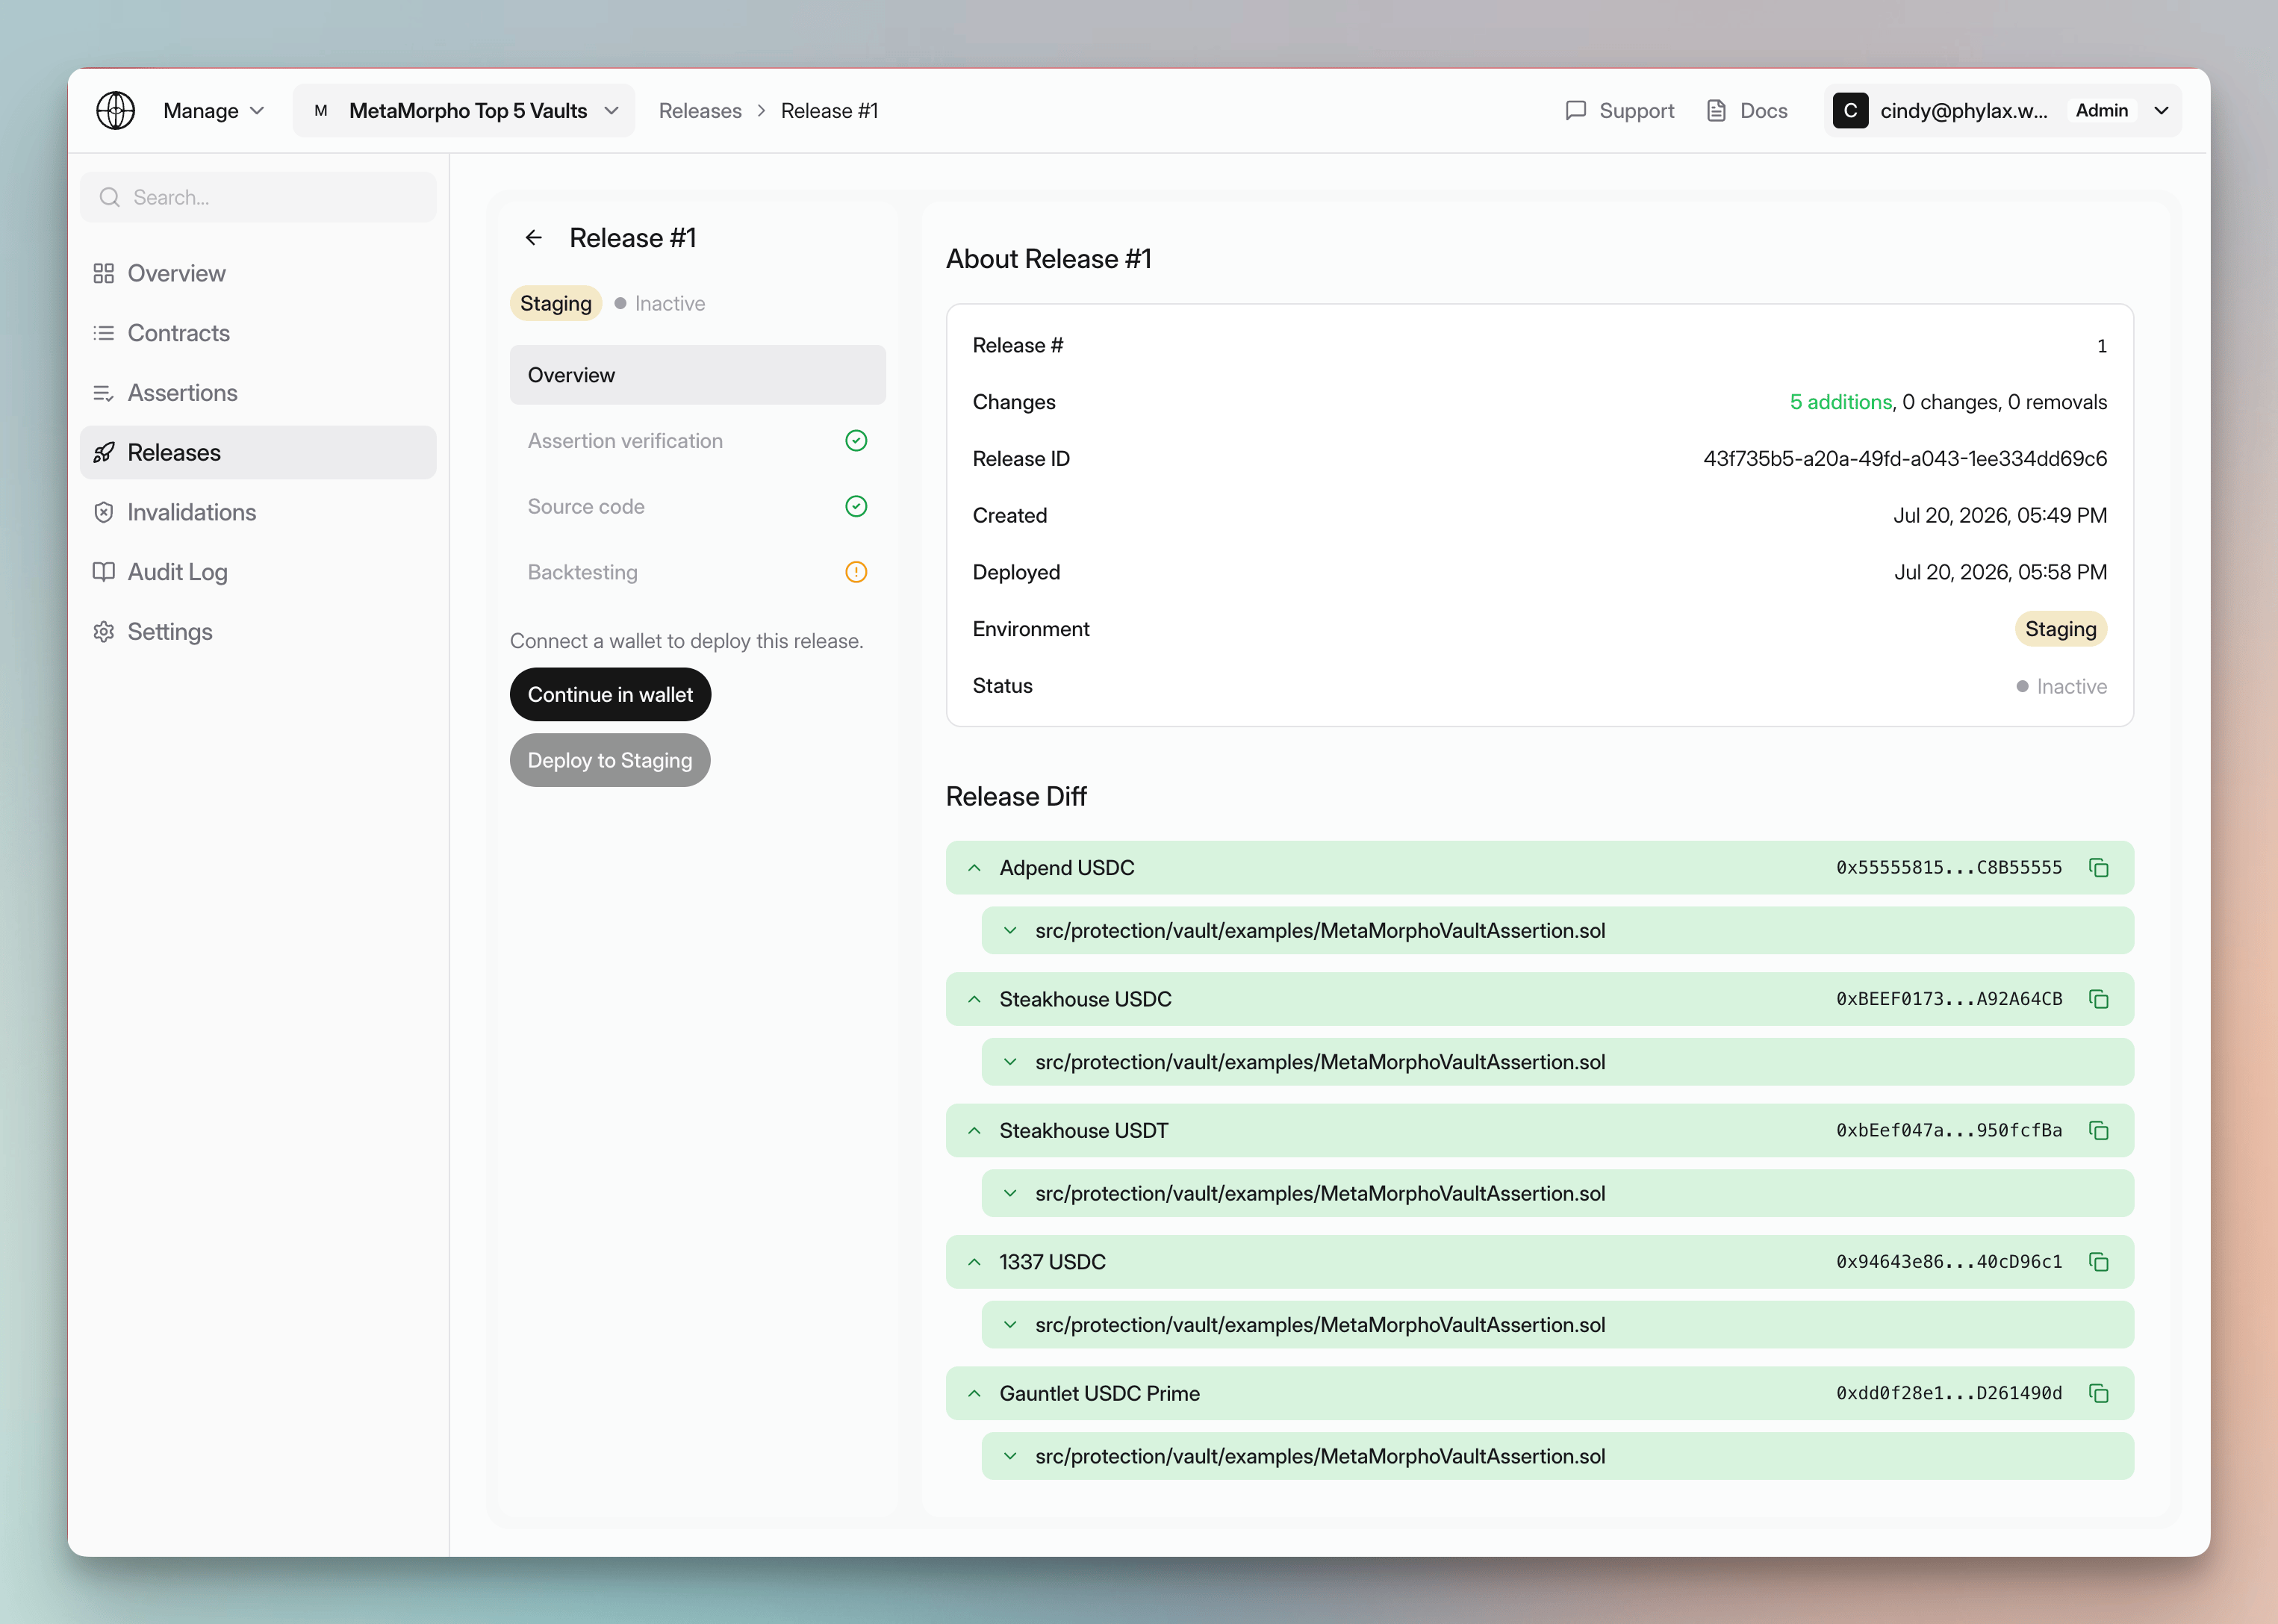 The platform checks assertion configuration, submitted source, and behavior against historical transactions before deployment. See [Release Review Checks](./release-review-checks) for the purpose and fields of each check, [How to Review Backtesting Results](./backtesting) for investigating a matched transaction, and [Deploy Assertions with the Platform](./deploy-assertions-dapp#step-4-deploy-the-assertion) for the complete deployment workflow.
### Project Settings
In the project settings tab, you can:
**Update Project Details:**
Here you can update the project name, description, and delete the project.
**Transfer Project Ownership:**
You can transfer projects and contracts (including their associated assertions) to other wallets. This allows you to transfer project ownership while maintaining all linked assertions and contracts.
**Protocol admin / manager wallet:**
The wallet that signs assertion lifecycle transactions can be separate from the day-to-day platform account. Use this separation when your team wants project collaborators to review releases and invalidations without requiring routine access to the multisig or governance wallet that controls deployment.
**Access controls:**
Admins can invite collaborators by email or wallet address. Use roles to separate review work from deployment authority:
| Role | Typical permissions |
| ------ | ----------------------------------------------------------------- |
| Viewer | View invalidations and project information without making changes |
| Editor | Create releases and configure notifications |
| Admin | Manage members, settings, and the protocol manager wallet |
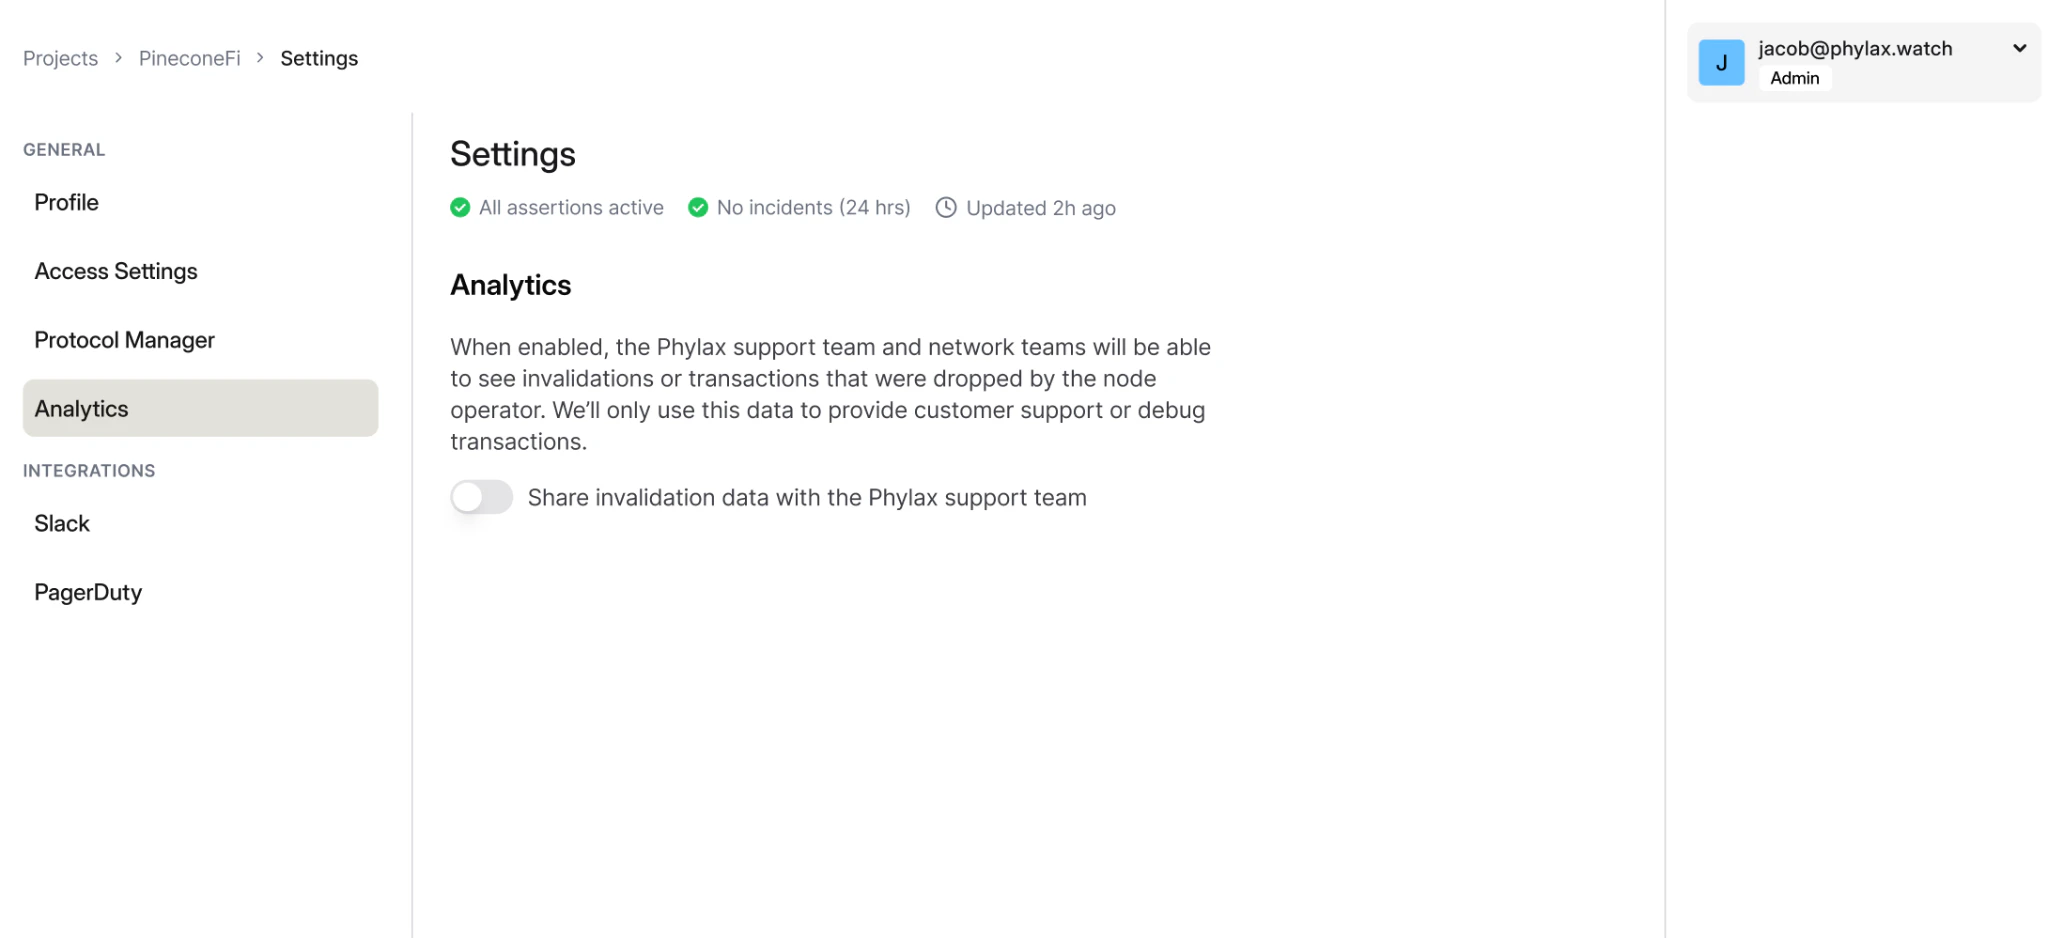
**Analytics sharing:**
Detailed invalidation evidence is scoped to project members. Admins can opt in to share invalidations or transactions dropped by the node operator with Phylax support and network teams for customer support and debugging.
**Integrations:**
Set up integrations to receive notifications when invalidations occur, including Slack and PagerDuty where available.
The platform checks assertion configuration, submitted source, and behavior against historical transactions before deployment. See [Release Review Checks](./release-review-checks) for the purpose and fields of each check, [How to Review Backtesting Results](./backtesting) for investigating a matched transaction, and [Deploy Assertions with the Platform](./deploy-assertions-dapp#step-4-deploy-the-assertion) for the complete deployment workflow.
### Project Settings
In the project settings tab, you can:
**Update Project Details:**
Here you can update the project name, description, and delete the project.
**Transfer Project Ownership:**
You can transfer projects and contracts (including their associated assertions) to other wallets. This allows you to transfer project ownership while maintaining all linked assertions and contracts.
**Protocol admin / manager wallet:**
The wallet that signs assertion lifecycle transactions can be separate from the day-to-day platform account. Use this separation when your team wants project collaborators to review releases and invalidations without requiring routine access to the multisig or governance wallet that controls deployment.
**Access controls:**
Admins can invite collaborators by email or wallet address. Use roles to separate review work from deployment authority:
| Role | Typical permissions |
| ------ | ----------------------------------------------------------------- |
| Viewer | View invalidations and project information without making changes |
| Editor | Create releases and configure notifications |
| Admin | Manage members, settings, and the protocol manager wallet |
**Analytics sharing:**
Detailed invalidation evidence is scoped to project members. Admins can opt in to share invalidations or transactions dropped by the node operator with Phylax support and network teams for customer support and debugging.
**Integrations:**
Set up integrations to receive notifications when invalidations occur, including Slack and PagerDuty where available.
 ### Security Evidence Links
Protocol teams can keep project evidence up to date so The Phylax Explorer can show a more complete public project page.
Useful evidence includes:
* public repository links
* audit report links
* audit scope or commit references, where available
* formal verification links, where applicable
* protected-contract labels
* assertion names and descriptions
This metadata helps reviewers understand what is protected, which code was reviewed, and whether deployed code appears to match known audited code.
## Project Dashboard
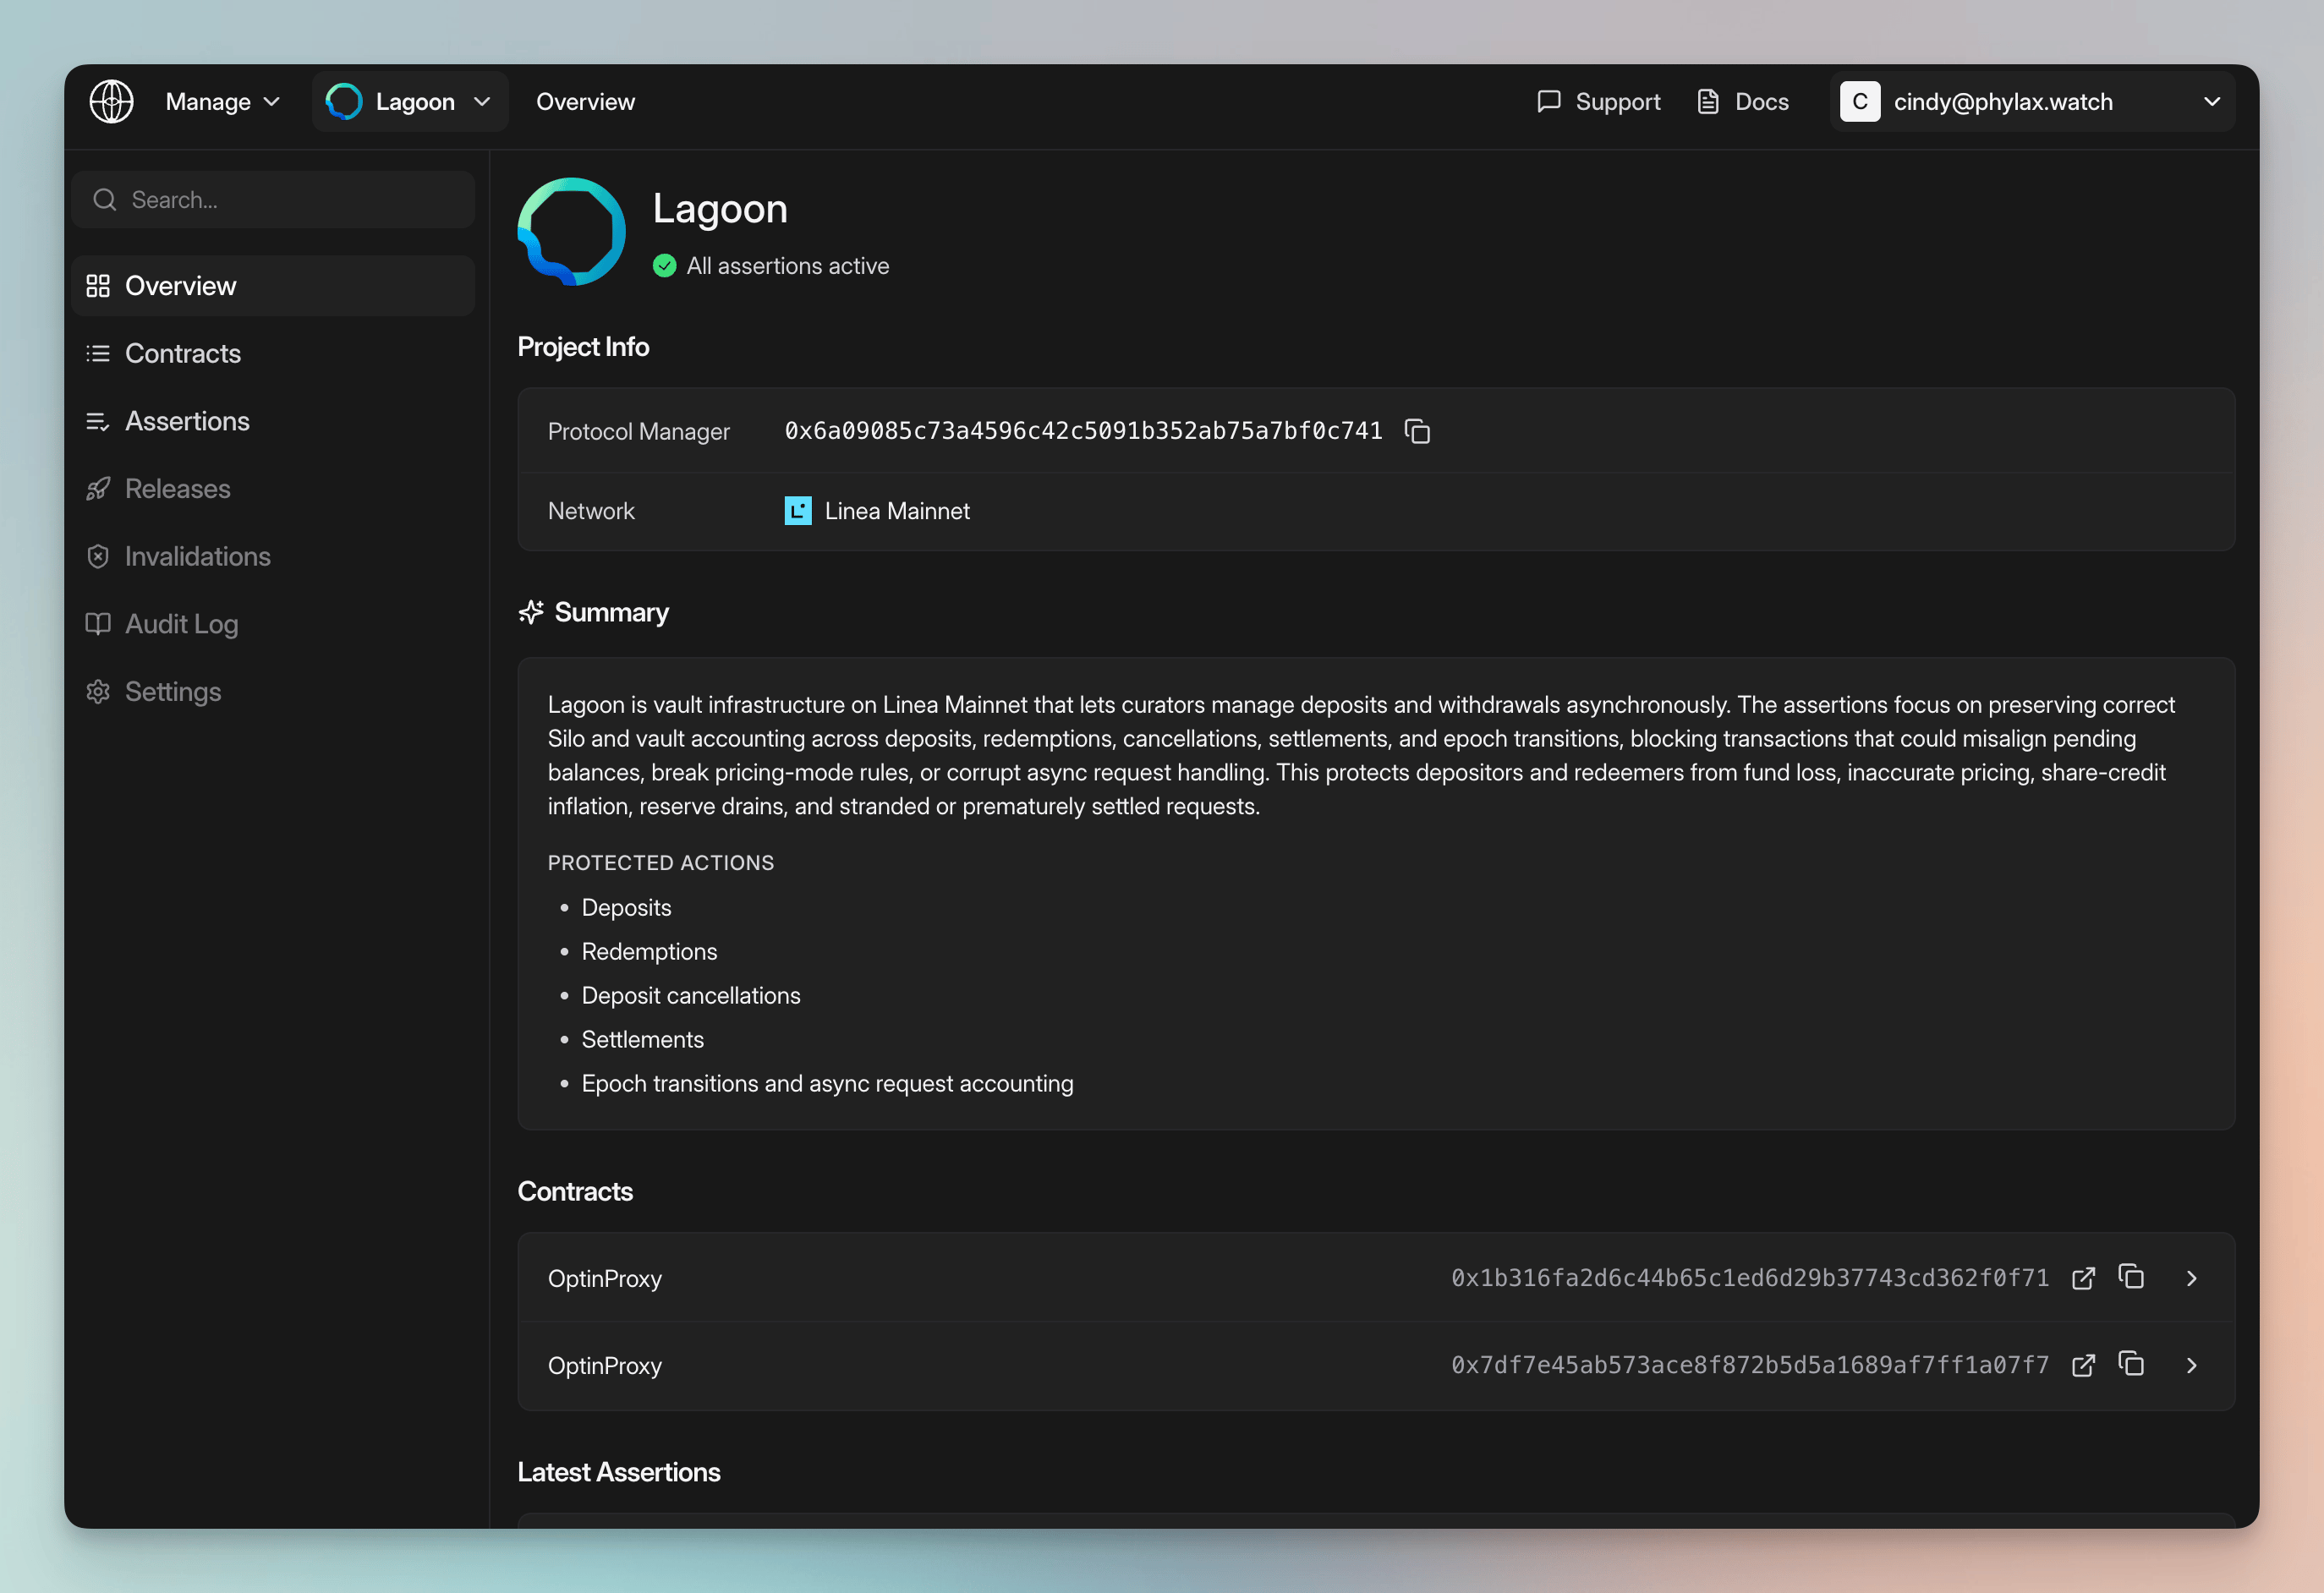
The project dashboard provides a unified view of your project's security:
* **Assertions**: View active and pending assertions
* **Releases**: Review and deploy changes
* **Operational Risk**: Review authority and change paths
* **Evidence**: Review audits and deployed-code context
* **Invalidations**: Inspect assertion violations
* **Audit Log and Settings**: Review activity and manage the project
### Security Evidence Links
Protocol teams can keep project evidence up to date so The Phylax Explorer can show a more complete public project page.
Useful evidence includes:
* public repository links
* audit report links
* audit scope or commit references, where available
* formal verification links, where applicable
* protected-contract labels
* assertion names and descriptions
This metadata helps reviewers understand what is protected, which code was reviewed, and whether deployed code appears to match known audited code.
## Project Dashboard
The project dashboard provides a unified view of your project's security:
* **Assertions**: View active and pending assertions
* **Releases**: Review and deploy changes
* **Operational Risk**: Review authority and change paths
* **Evidence**: Review audits and deployed-code context
* **Invalidations**: Inspect assertion violations
* **Audit Log and Settings**: Review activity and manage the project
 ### Audit Log
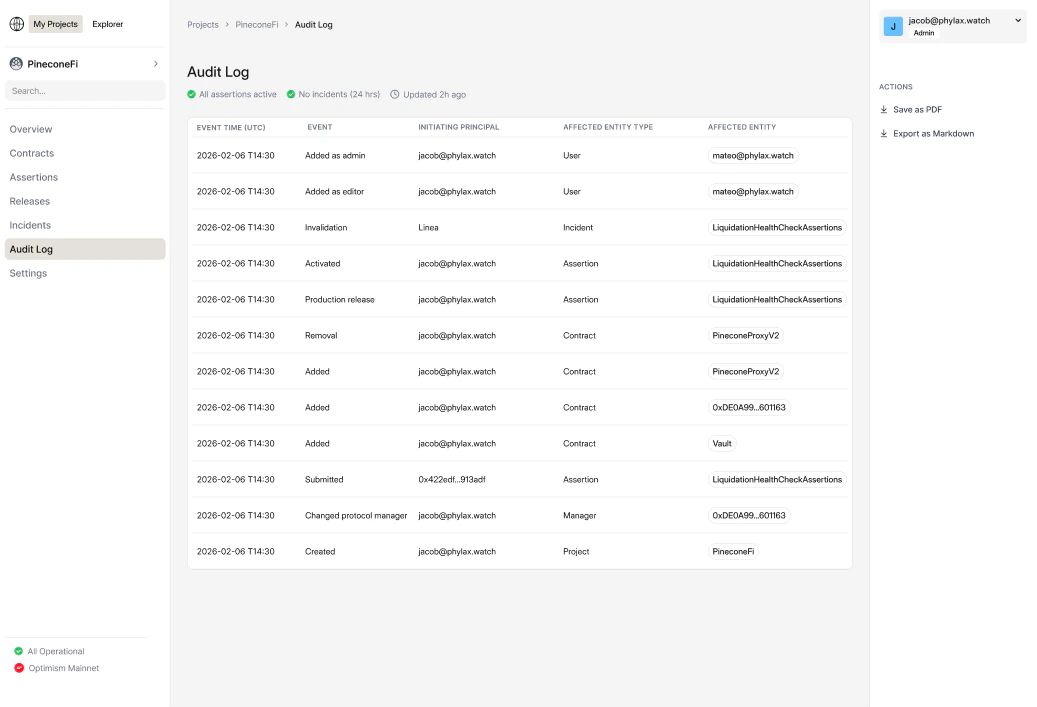
The audit log gives your team a chronological record of project activity. Use it to answer what changed, who initiated the change, what entity was affected, and when the change occurred.
Audit log entries can include:
* Project creation and profile changes
* Contracts added or removed
* Assertions submitted, activated, or removed
* Production and staging release events
* Protocol manager changes
* Collaborator role changes
* Invalidation-related activity
### Audit Log
The audit log gives your team a chronological record of project activity. Use it to answer what changed, who initiated the change, what entity was affected, and when the change occurred.
Audit log entries can include:
* Project creation and profile changes
* Contracts added or removed
* Assertions submitted, activated, or removed
* Production and staging release events
* Protocol manager changes
* Collaborator role changes
* Invalidation-related activity
 ## Next Steps
Step-by-step guide to using the platform
Learn how to write assertions for your contracts
Understand ownership requirements
`pcl` command reference
## Next Steps
Step-by-step guide to using the platform
Learn how to write assertions for your contracts
Understand ownership requirements
`pcl` command reference